Creating high-quality designs for print can feel like a daunting task, but Canva’s user-friendly platform makes it easier than ever. Whether you’re crafting business cards, flyers, or brochures, understanding the nuances of preparing your files for professional printing can make all the difference.
Watch the video to explore how to create print-ready files in Canva, or follow the step-by-step guide below to get started.
Step 1: Set the Correct Page Size
Before diving into your design, ensure your Canva project is set to the exact dimensions of the final printed product. For example, if an A5 page is required, set your artwork to A5 dimensions from the start:
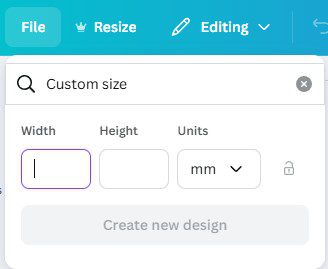
- Open Canva and start a new design.
- Click “Custom Size” and enter the specific width and height in millimetres. (A5 is 148 mm x 210 mm.)
Accurate page sizing helps avoid issues with scaling or distortion when printing.
Step 2: Enable Print Bleed
Bleed refers to the extra area beyond the edge of your design that ensures no white borders appear when the file is trimmed. Without bleed, small misalignments during cutting could lead to unwanted edges.
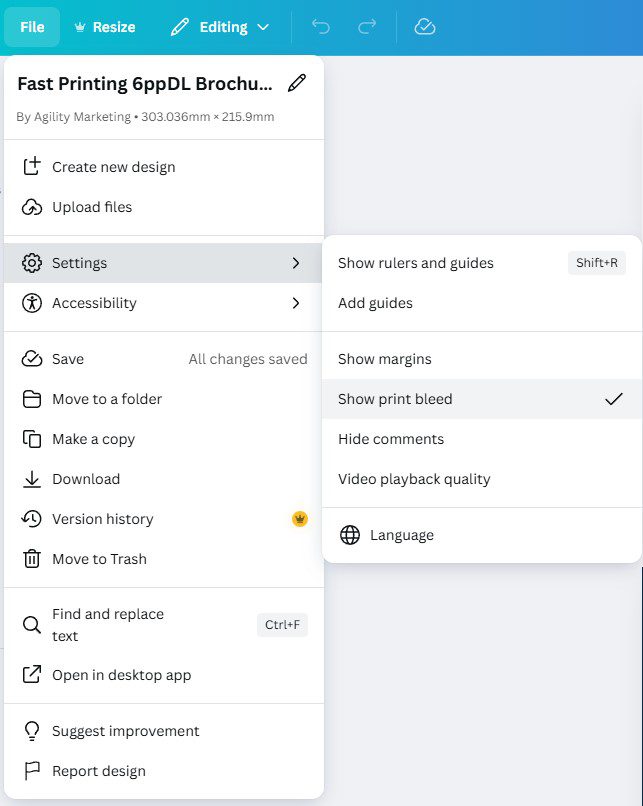
- Click on File in the top-left corner.
- Select Show print bleed. A dotted line will appear, marking the edge of the final design area. Ensure all background images and colours extend beyond this line.
Step 3: Consider Internal Margins
Just as bleed protects against accidental white edges, internal margins protect important elements like text from being trimmed off. Follow these guidelines:
- Leave a minimum of 3mm margin between the edge of the page and critical elements.
- For larger designs, increase the margin:
- 5mm for pages up to A3.
- 10mm for pages larger than A3.
This buffer ensures the design remains intact after trimming.
Step 4: Choose Appropriate Font Sizes
Avoid cramming too much text into the design. Font size and readability are key:
- Use a minimum of 9pt for standard fonts. Some fonts may appear smaller at the same size, so test the design.
- Print a sample at home to verify readability at actual size.
- If a printer is not available, approximate the printed page size on the screen to test readability, keeping in mind that backlit screens may make text appear easier to read.
Step 5: Finalise Your Design
Before exporting, double-check your design:
- Text and Images: Ensure all text is within the safe area (inside the dotted bleed line).
- Resolution: Use high-resolution images to avoid pixelation.
- Spelling and Grammar: Proofread the content thoroughly.
Step 6: Export Your Design
Once the design is complete, follow these steps to export it as a print-ready file:
- Click on the Share button in the top-right corner.
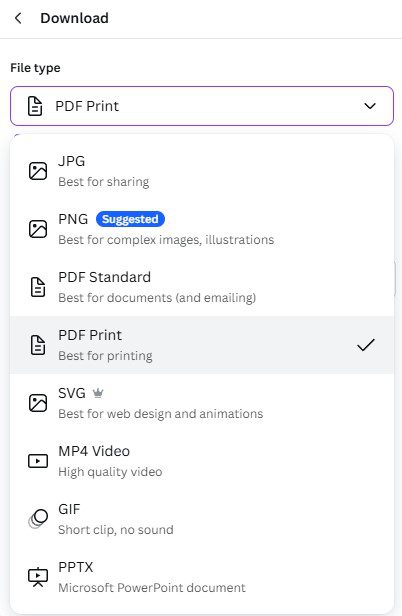
- Select Download.
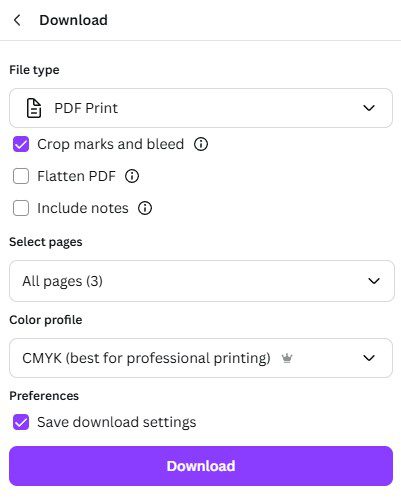
- In the File type dropdown, choose PDF Print for high-quality output.
Tick the boxes for Crop marks and bleed. Crop marks show where the file will be trimmed, and the bleed ensures edge-to-edge printing.
Step 7: Use CMYK Colour Mode
For accurate colour reproduction in print, switch to CMYK (Cyan, Magenta, Yellow, Black) colour mode. Canva defaults to RGB, which is best for digital screens but may cause colour discrepancies in print.
- Under Colour Profile, choose CMYK. (Note: This feature is available for Canva Pro users.)
- If using the free version, be aware that colours may shift slightly when converted by the printer.
Pro Tip: The colours on the actual printed page will probably be different from what is seen on screen. There are many technical reasons behind this, so if exact colour accuracy is important, it is advisable to work with the print supplier to get a printed proof before production starts.
Step 8: Review Your Exported File
After downloading the PDF:
- Open the file using a PDF viewer.
- Check for:
- Bleed and Crop Marks: Ensure these are present.
- Text and Images: Verify alignment and legibility.
- Colours: Ensure they appear as expected.
If colours look off, return to Canva to adjust them and re-export the file. Double-check with the printer to confirm specific requirements.
Common Mistakes to Avoid
- Forgetting Bleed: Always extend backgrounds or images to the bleed line.
- Not Using CMYK: RGB colours may look vibrant on screen but appear muted in print.
- Flattening PDFs: Avoid ticking the “Flatten PDF” option, as it prevents text and vector elements from being editable later.
Conclusion
Producing a print-ready file from Canva is simple once the steps are understood. By setting the correct page size, enabling print bleed, using appropriate margins, and exporting with the correct settings, the designs will look professional and polished in print. Whether creating flyers, business cards, or posters, following these tips ensures a seamless printing experience.
If you need further assistance, our team at Agility Print is always here to help. While Canva support can guide you through their platform, professional printers like us use specialised software to ensure your design meets all technical requirements. This means we might need to recreate your design to get it just right for print. Investing in this service often delivers the best results, ensuring your final product is both polished and professional.
“How to create a print ready PDF for print in Canva | CMYK + how to include crops & bleeds | tutorial” (YouTube, 2023-07-11) https://www.youtube.com/watch?v=p7Uug3G3s-A

